
Hanging Indent in Google Slides: A Step-by-Step Guide
You have spent hours building a polished presentation. Your content is solid, your visuals are clean, and then you get to your references or bibliography slide and everything looks off. The text wraps awkwardly, lines run together, and the whole slide feels unfinished.
This is one of the most common formatting frustrations in Google Slides, and the culprit is almost always a missing hanging indent. Unlike Microsoft Word, Google Slides does not offer a one-click hanging indent option. But that does not mean it is impossible to do. It just takes a slightly different approach.
In this guide, you will learn exactly how to do a hanging indent in Google Slides, why it matters for your presentations, and how to apply it consistently across citation lists, bibliographies, and reference slides. By the end, you will have the formatting knowledge to make even the most text-heavy slides look structured and professional.
What Is a Hanging Indent and Why Does It Matter
A hanging indent is a paragraph style where the first line of text starts at the left margin and all subsequent lines are indented. This is the opposite of a standard first-line indent, which is why it is sometimes called a negative indent.
You will recognize hanging indents immediately in academic and professional contexts. MLA, APA, and Chicago citation styles all require them for works cited pages and reference lists. They make it easier for a reader to scan a list of sources because the first line, usually the author’s name or title, stands out visually from the wrapped text below it.
In a presentation, a hanging indent on a references slide signals attention to detail. It shows your audience, whether they are professors, clients, or conference attendees, that your work is formatted with care.
How to Do a Hanging Indent in Google Slides
Google Slides does not have a dedicated hanging indent button in the toolbar. However, you can create a clean hanging indent using the ruler tool combined with precise marker adjustments. Here is the exact process.
Step 1: Open the Ruler in Google Slides
First, make sure your ruler is visible. Go to View in the top menu and select Show Ruler. A horizontal ruler will appear at the top of your slide editing area. If the ruler is already visible, you can skip this step.
Step 2: Click Inside Your Text Box
Click on the text box that contains the text you want to format. Make sure you click inside the text box so it is in edit mode. You should see a blinking cursor inside the box.
To apply the hanging indent to all the text in that box, press Ctrl + A on Windows or Cmd + A on Mac to select everything at once. If you only want to format specific paragraphs, click and drag to highlight just that text.
Step 3: Set the Left Indent Using the Ruler
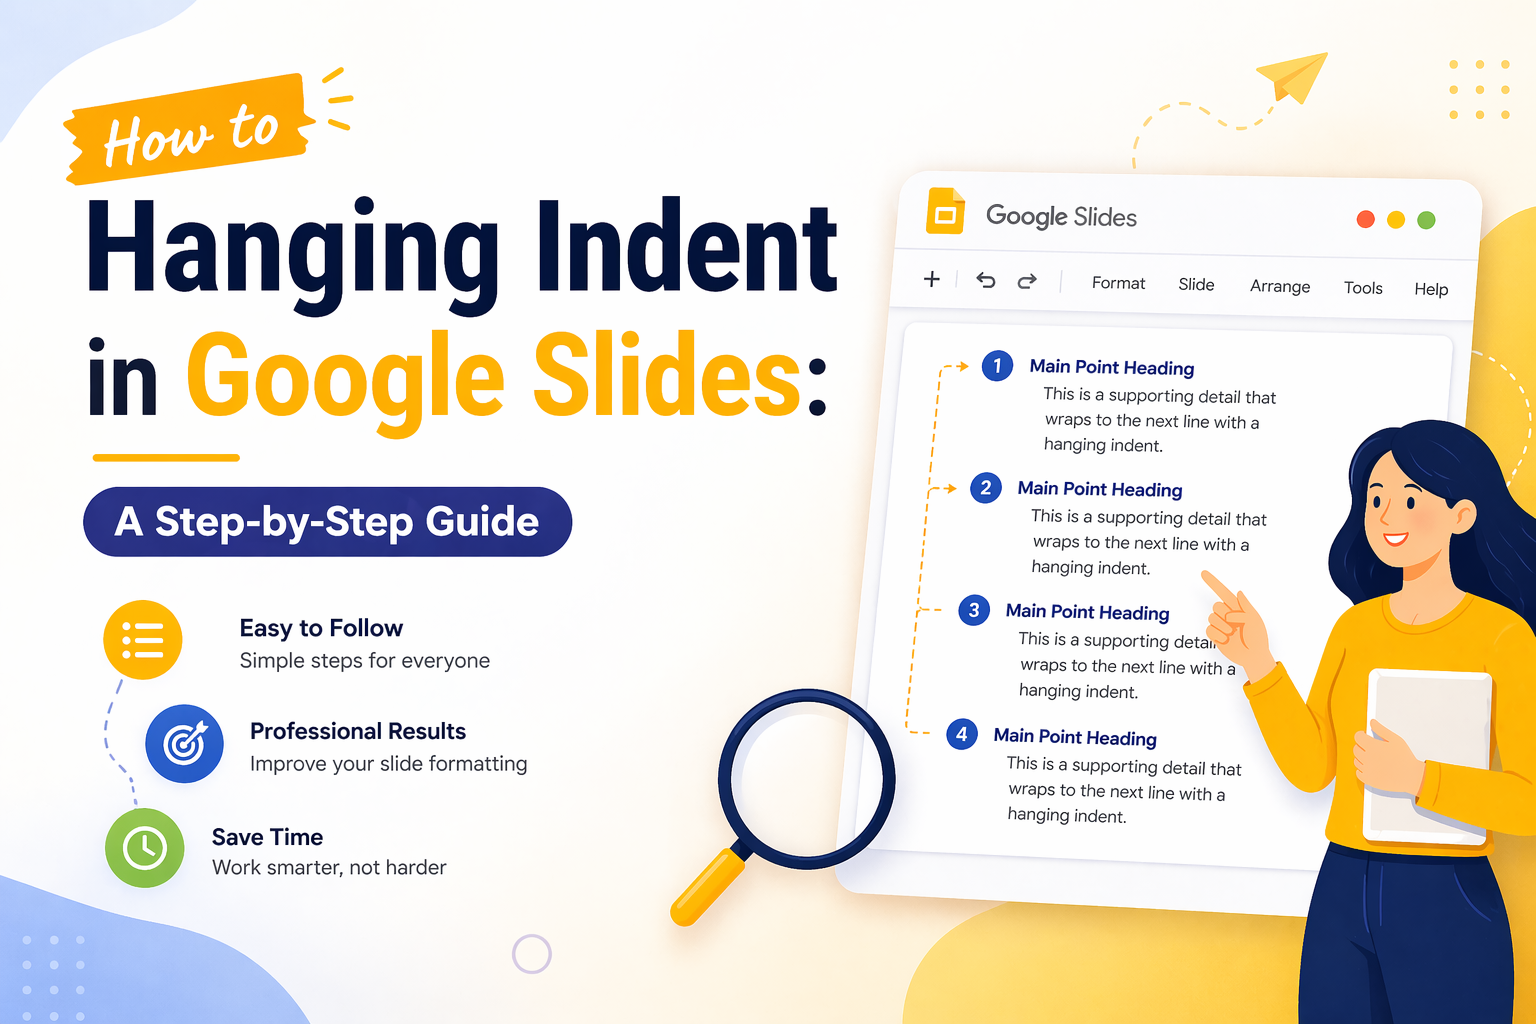
Look at the ruler at the top of the slide. You will see two small markers: a light blue rectangle at the very top, which controls the first-line indent, and a downward-pointing triangle just below it, which controls the left indent for all other lines.
To create a hanging indent, drag the bottom triangle (the left indent marker) to the right while keeping the top rectangle in its original position at the left margin. A setting of around 0.5 inches is a good starting point for most citation styles.
Tip: The top rectangle and bottom triangle may look like they are stacked together. Click carefully on just the bottom triangle. If both move at once, press Ctrl + Z to undo and try again.
Step 4: Keep the First Line at the Left Margin
After moving the bottom triangle to your chosen indent position, make sure the top rectangle (first-line indent marker) is still sitting at the far left of the ruler at zero. This ensures only the first line of each entry starts at the margin, while all wrapped lines are indented beneath it.
This is the exact structure of a hanging indent: first line flush left, remaining lines indented.
Step 5: Fine-Tune With the Tab Key (Optional)
If you are working with a bulleted or numbered list and need even more control, you can also use the Tab key to push specific lines inward. However, for citation formatting, the ruler method gives you more consistent and precise results across all lines.
How to Do a Hanging Indent on Google Slides Without the Ruler
If you find the ruler fiddly or it is not visible on your device, there is a second approach using the Format menu.
- Click inside your text box and select the text you want to format.
- Go to Format in the top menu and click Align and Indent.
- Select Indentation Options from the submenu.
- In the dialog that appears, look for the Special Indent dropdown.
- Choose Hanging from the dropdown.
- Enter your desired indent amount, typically 0.5 inches for academic work, and click Apply.
This method is often faster for users who prefer menu-based controls over dragging ruler markers. Both methods produce the same result, so use whichever feels more comfortable.
Common Use Cases for Hanging Indents in Google Slides
Knowing how to create a hanging indent in Google Slides is especially useful in the following situations.
Academic Reference and Bibliography Slides
If you are presenting a research paper, thesis defense, or class project, you will likely need a references slide formatted in APA, MLA, or Chicago style. All three styles require hanging indents for their citation lists. Using the ruler method or the indentation options dialog allows you to match the formatting standard your institution or instructor expects.
Works Cited Slides for School Presentations
Students creating presentations for English, history, science, or any research-based class frequently need a properly formatted works cited slide. A hanging indent makes each citation entry easy to read at a glance, even from a distance. It also demonstrates that you followed the assignment’s formatting requirements carefully.
Source Attribution in Business and Client Presentations
Even in professional settings, slides that cite data sources, case studies, or third-party research benefit from structured formatting. A hanging indent on a sources or footnotes slide keeps information scannable without making the slide feel cluttered.
Glossary or Definition Slides
Hanging indents are not limited to citations. Glossary slides, where a term appears on the first line and its definition wraps below, also benefit from this formatting style. It creates a clear visual separation between each term and its explanation
Hanging Indent in Google Slides vs. PowerPoint
If you have used PowerPoint before, you may have noticed it handles indents slightly differently. PowerPoint offers hanging indent controls through the Paragraph dialog box, which many users find more intuitive.
In Google Slides, the ruler method is the closest equivalent, but it requires a bit more manual precision. The good news is that once you get the hang of it, it takes under a minute to apply.
If you work across both platforms, you may also want to explore our collection of professionally designed templates built for both PowerPoint and Google Slides. Starting with a template that already has proper formatting structures in place saves you a significant amount of time. You can browse the full library at SlidesDepot
Tips for Getting a Clean Hanging Indent Every Time
- Zoom in on the ruler before dragging the indent markers. This makes it easier to position them accurately.
- Select all text in the box before adjusting the ruler so that the indent applies consistently to every paragraph, not just where your cursor is placed.
- Use consistent indent distances across all slides. If you set 0.5 inches on one slide, use the same value on any other slides with similar formatting.
- Avoid using the spacebar to manually push text inward. This creates uneven spacing that breaks whenever the font size or text box width changes.
- Test your formatting on different screen sizes if you are presenting on a screen other than your own. Sometimes what looks aligned on your laptop shifts slightly on a projector or external display.
Why Formatting Details Like This Matter in Presentations
It might be tempting to skip the hanging indent and just let the text wrap however it wants. But formatting choices, even small ones, shape how your audience perceives your work.
A consistently formatted slide deck signals that you are thorough and professional. It shows that you cared enough to get the details right. For students, this can mean the difference between a good and excellent grade. For professionals and founders, it can affect how a client or investor perceives your credibility.
Presentation design is not just about visuals. Typography and text formatting are equally important. A well-structured references slide at the end of a presentation can leave a surprisingly strong final impression.
If you want to go beyond individual formatting tweaks and build entire presentations that already follow best design practices, browse our free and premium Google Slides and PowerPoint templates at SlidesDepot, designed for professionals, students, and educators.
Free Templates to Get You Started
If you are building an academic or research presentation and need a solid starting point, SlidesDepot has a range of templates that include pre-formatted slide layouts for citations, references, and bibliography pages. These templates are designed to save you time on formatting so you can focus on your content.
Whether you need a clean academic deck, a student research presentation, or a professional business template that includes a sources slide, you will find options ready to download and customize.
Browse free and premium templates at SlidesDepot and find the right starting point for your next presentation.
Conclusion
A hanging indent in Google Slides is one of those small formatting details that makes a real difference in how polished and credible your presentation looks. Whether you are citing sources for an academic project, attributing data in a business deck, or building a glossary slide for a class, getting the indent right matters.
Use the ruler method for precise control, or take the Format menu route if you prefer a dialog-based workflow. Either way, you now have the tools to format your slides with confidence. And if you want to skip the formatting groundwork altogether, starting with a professionally designed template is always the smartest move.
Head over to SlidesDepot to browse hundreds of free and premium templates built for Google Slides and PowerPoint. Find one that fits your needs and make your next presentation your best one yet.

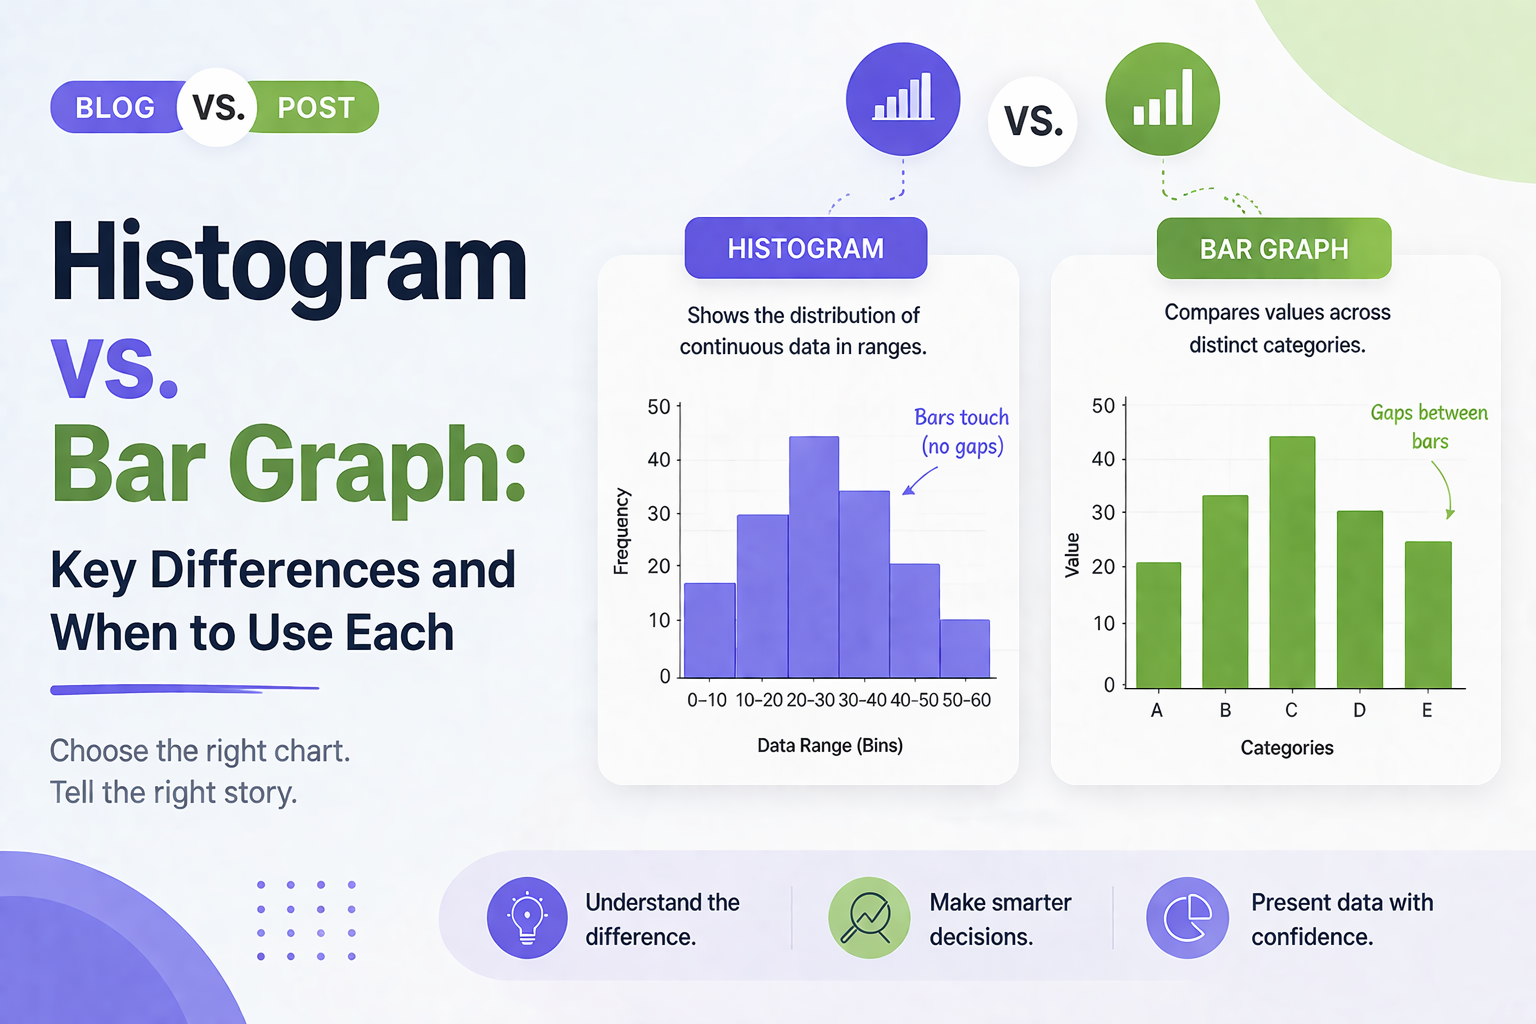
Histogram vs Bar Graph: Key Differences and When to Use Each
Histogram vs Bar Graph You have got data. You need a chart. You open PowerPoint or Google Slides and hover over the chart options. Then it hits you: should this be a histogram or a bar graph? They look almost identical, so it is easy to assume they are interchangeable. But they are not, and…
What Is a Multimedia Presentation and Why Does It Matter in 2026?
Picture two slide decks. One is plain text, slide after slide, in the same gray bullet format you’ve seen a hundred times. The other has a short product clip, a clean chart, and a quick voice note from a happy customer. The second one sticks with you days later, and the first one doesn’t. That…
Best Meeting Minutes Templates to Keep Meetings Organized and Actionable
Most teams have sat through a meeting that felt productive in the moment, only to realize a week later that nobody can remember what was actually decided, or who was supposed to do what. The meeting itself wasn’t the problem. The way it was documented was. Good meeting minutes are what turn a conversation into…