

How to Make a Link Clickable in PowerPoint and Google Slides
You’ve built a solid presentation. The slides look great, the content flows well and then someone in the audience clicks on what they think is a link, and nothing happens. It’s a small moment, but it can quietly undermine your credibility.
Adding clickable links to your presentation is one of those things that feels optional until it isn’t. Whether you’re directing your audience to a product page, a research source, a video, or a contact form, a working hyperlink makes your deck interactive and professional.
In this article, you’ll learn exactly how to make a link clickable in both PowerPoint and Google Slides including links on text, images, shapes, and buttons. You’ll also find practical tips to ensure your links work every time, across every device.
Let’s get into it.
Why Clickable Links Matter in Presentations
Most presentations are no longer printed handouts they’re shared digitally as files, embedded in websites, or presented on screens where the audience can interact with them directly.
A clickable link does more than point to a URL. It keeps your slide clean (no long, messy web addresses), guides your audience to the right next step, and adds a layer of interactivity that static slides simply can’t offer.
Here’s where clickable links are especially useful: linking to a live demo, product page, or external resource; directing viewers to your portfolio or contact form after a pitch; citing sources in academic or research presentations; creating navigation buttons within the presentation itself; and embedding links in shared decks sent via email or uploaded online.
Whether you’re building a pitch deck, a lesson plan, or a client proposal, knowing how to add a hyperlink in PowerPoint or Google Slides is a fundamental presentation skill.
How to Make a Link Clickable in PowerPoint
PowerPoint gives you several ways to insert a clickable link, depending on what you want to link text, an image, a shape, or even a slide within the same file.
Adding a Hyperlink to Text
This is the most common method and takes under 30 seconds. Select the text you want to turn into a link. Go to the Insert tab in the ribbon. Click Link, or press Ctrl + K on Windows or Cmd + K on Mac. In the dialog box, paste or type the URL into the Address field. Click OK.
Your text will now appear underlined and in a different color, indicating it’s a clickable link. During your slideshow, clicking it will open the URL in your default browser.
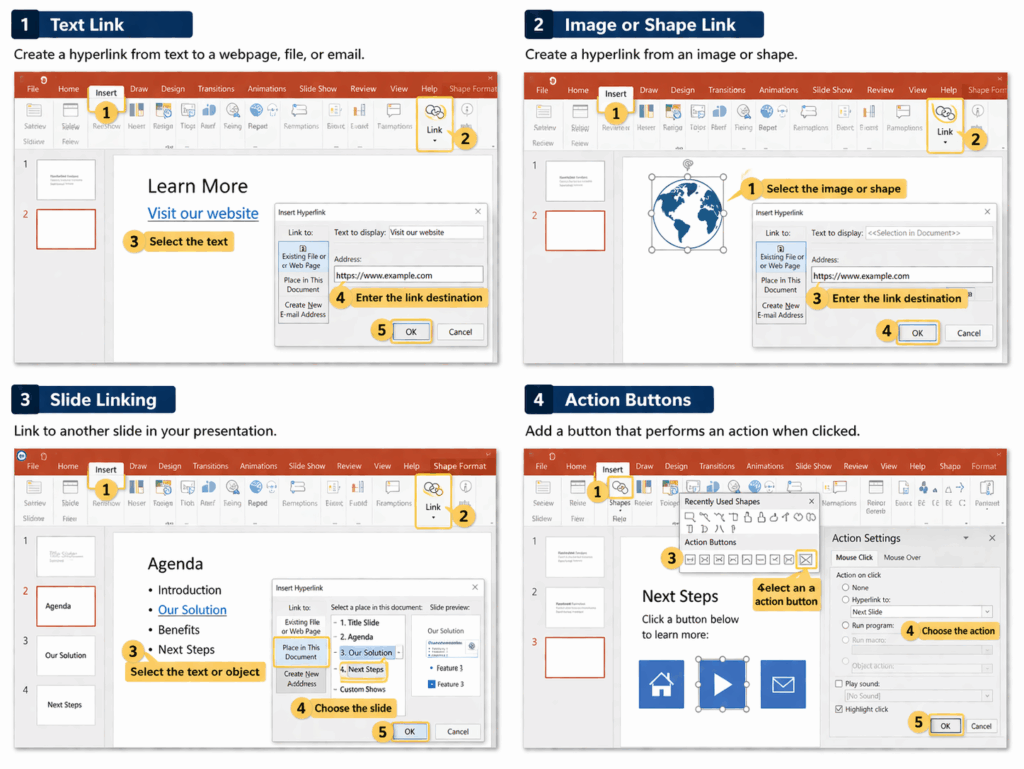
Adding a Hyperlink to an Image or Shape
You can make any visual element an image, icon, or shape into a clickable link. This is ideal for buttons and CTAs. Click to select the image or shape. Press Ctrl + K or Cmd + K, or go to Insert > Link. Paste your URL in the Address field and click OK. The image or shape won’t look different, but it will be fully clickable in Presentation mode.
Linking to Another Slide Within the Same File
This is useful when you’re building a non-linear presentation like an FAQ section that lets viewers jump to specific topics. Select the text, image, or shape you want to use as a trigger. Open the Insert Link dialog with Ctrl + K. In the left panel, choose Place in This Document. Select the slide you want to link to and click OK.
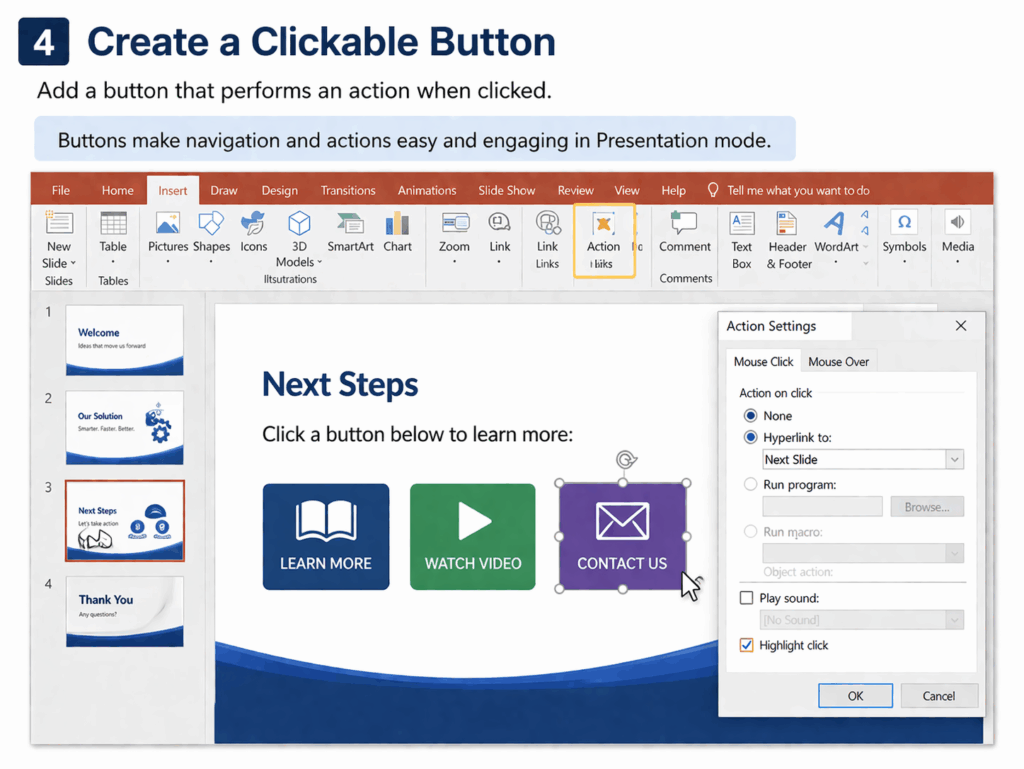
Using Action Buttons
PowerPoint has built-in Action Buttons pre-made shapes that function as navigation controls. You’ll find them under Insert > Shapes, at the very bottom of the shapes panel. Insert one onto your slide, and PowerPoint will automatically prompt you to assign an action including linking to a URL, a different slide, or even running a program. These work well for presentation kiosk setups or self-running decks.
A few tips before you present: Always test every link in Slide Show mode before going live links don’t activate in Editing mode. Use friendly anchor text like “View the report” instead of pasting a raw URL. Check your links after sharing the file to make sure they still resolve correctly.
How to Make a Link Clickable in Google Slides
Google Slides makes it just as straightforward to insert a clickable link, and because it’s cloud-based, your links stay live even when the file is shared via a direct URL.
Adding a Hyperlink to Text
Highlight the text you want to link. Press Ctrl + K on Windows or Cmd + K on Mac, or go to Insert > Link. A small popup will appear paste your URL in the link field. Press Enter or click Apply.
The text will turn blue and become underlined. The link is active immediately. You can even click it directly in editing mode by hovering and selecting the URL that appears in the popup.
Adding a Hyperlink to an Image or Shape
Click the image or shape you want to make clickable. Press Ctrl + K or go to Insert > Link. Paste your URL and press Enter. In Google Slides, linked images and shapes show a small link icon when you hover over them in editing mode, making it easy to confirm a link is attached.
Linking to Another Slide
Highlight your text or select an element. Open the Link dialog with Ctrl + K. Below the URL field, you’ll see a section labeled Slides in this presentation. Click to expand it and choose the target slide. Click Apply.
One thing worth knowing about Google Slides: clickable links work in Present mode, but also in the shared link view. This makes it ideal for asynchronous decks where viewers are browsing on their own. If you want your presentation to behave more like a webpage, use the Publish to the web option under File all links will be fully accessible to anyone who views it.
How to Create a Clickable Button in Your Presentation
Sometimes a plain hyperlinked word isn’t enough especially in pitch decks or marketing slides. A clickable button draws attention and makes the desired action obvious.
Start by inserting a shape a rectangle or rounded rectangle works well. Add a text label to the shape, something like “Visit Our Website” or “Download the Report.” Style it with a contrasting fill color and adjust the font so it reads clearly. Then select the shape, open the Link dialog with Ctrl + K, and add your URL.
The result is a professional-looking button that functions exactly like a hyperlink. Many well-designed templates already include CTA buttons ready for you to edit. If you’re building from scratch, browsing the business presentation templates on SlidesDepot can save you significant design time the layouts come with pre-built interactive elements you can adapt immediately.
Common Issues With Clickable Links and How to Fix Them
Even when you follow every step correctly, links can sometimes behave unexpectedly. Here are the most frequent problems and their solutions.
The most common issue is a link that doesn’t respond during the presentation. This almost always happens because the presenter is in editing mode rather than Slide Show or Present mode. In PowerPoint, press F5 or click the Slide Show icon. In Google Slides, go to View > Present. Links only activate when you’re in presentation mode.
If a link opens the wrong page, double-check the URL in the link dialog. A missing “https://” or a small typo can redirect viewers to the wrong destination or nowhere at all. Always paste URLs directly from your browser’s address bar to avoid this.
If your link works on your machine but breaks when shared, you’re likely using a local file path. Links to files on your desktop or internal network won’t work for others. Always use full web URLs beginning with https:// for any presentation you plan to share.
If your linked text is hard to read because of the default hyperlink color, you can change it. In PowerPoint, go to Design > Colors > Customize Colors and adjust the Hyperlink color. In Google Slides, select the linked text and manually change the font color using the text color tool.
Finally, if links disappear after converting between formats say, from PPTX to PDF or from Google Slides to PowerPoint always run a quick check in presentation mode after any conversion to verify everything still works.
Best Practices for Using Links in Presentations
Knowing how to make a link clickable is the technical part. Using links well is what separates a good presentation from a great one.
Keep your link text descriptive. “Learn more about our pricing” is far clearer to a viewer than “click here.” Don’t overload your slides one or two clickable elements per slide is usually enough. More than that, and the slide starts to feel cluttered and unfocused.
Every link should serve a clear purpose. Ask yourself: where does this take the audience, and does that destination add value to what they’re hearing? If the answer isn’t obvious, the link probably doesn’t need to be there.
Test your presentation on the device you’ll use to present. A link that works perfectly on your laptop may behave differently on a conference room screen or in a different browser. For long URLs you might need to read aloud or display as text, a URL shortener like bit.ly can help keep things clean.
If you’re sharing your deck via email, consider saving it as a PDF. PDFs preserve clickable links reliably and open consistently across devices and operating systems.
Free Templates to Get You Started
If you’re spending time building slides from scratch just to add links and polish the layout, a professionally designed template can save you hours. SlidesDepot offers a wide library of free and premium templates for both PowerPoint and Google Slides all ready to customize, with clean layouts that make it simple to drop in your own hyperlinks, buttons, and branded content.
Whether you’re working on a pitch deck, a client proposal, or a classroom presentation, you’ll find templates built for real-world use. Browse the full collection at slidesdepot.com/templates and start with something polished instead of a blank slide.
Conclusion
Learning how to make a link clickable in PowerPoint or Google Slides is one of the simplest ways to make your presentation more useful, more professional, and more engaging. Whether you’re linking to an external website, a supporting document, or another slide in your deck, the process takes less than a minute and the impact on your audience is real.
Start with a great template, and adding interactive elements like clickable links becomes even easier. A well-structured layout lets you focus on your content instead of fighting with formatting.
Ready to build something impressive? Browse free PowerPoint and Google Slides templates on SlidesDepot and find the perfect starting point for your next presentation.

PPT Meaning: Beginner Guide + Free PPT Templates from SlidesDepot
If you’ve ever been asked to create a PPT for school, college, or work, you might wonder what exactly PPT means. For beginners, this confusion is common, especially if you’re new to presentations or digital tools. Understanding the PPT meaning is the first step toward creating clear, organized, and professional presentations. This beginner-friendly guide explains what PPT is, how…

How to Add Audio to Google Slides (Step-by-Step Guide)
How to insert audio into google slides Want to make your presentation more engaging? Adding audio to your slides – whether it’s a voiceover narration, background music, or a sound effect – can turn a flat deck into a memorable experience. In this guide, the SlidesDepot team walks you through exactly how to add audio to Google Slides, step…
How to Convert Canva Presentations to Google Slides in Minutes (2026 Guide)
You spent hours building a beautiful presentation in Canva. The fonts are on point, the colors match your brand, and the layout looks exactly how you imagined it. Then someone asks for the file in Google Slides format, and suddenly the whole process feels far more complicated than it should be. This is a frustration…