

How to Make Pictures Transparent in Google Slides in Seconds



Knowing how to make an image transparent in Google Slides is one of those small skills that quietly upgrades every presentation you build. You don’t need Photoshop. You don’t need a third-party tool. The control is built right into Google Slides and it just takes a moment to find it.
This guide walks you through the exact steps, the best use cases, and a few pro tips to get the result looking intentional rather than accidental.
Why Image Transparency Matters More Than You’d Think
Full-opacity images are fine when the photo is the entire point of a slide. But most of the time, images are supporting elements. A background, a watermark, a texture layer behind your data. When they compete with your text instead of framing it, the slide loses clarity fast.
Pulling an image back to 20–40% opacity changes that dynamic immediately. It sits behind the content rather than fighting for the same visual space. The technique is especially useful for background photos, brand logo placements, and overlay graphics on busy or dark slides.
Google Slides calls this feature “Adjusting transparency” inside the Format options panel. You may also see it referred to as image opacity. They mean the same thing: how see-through the image appears on your slide.
How to Make an Image Transparent in Google Slides: Step by Step
Step 1: Open Your Presentation
Open the file in your browser. Google Slides runs entirely in Chrome or any modern browser with no software install needed.
Step 2: Click on the Image You Want to Adjust
A single click selects it. You will see blue selection handles appear at the corners and edges of the image. Make sure you have clicked the image itself, not a text box that may be layered on top of it.
Step 3: Open Format Options
Go to Format in the top menu bar, then select Format options from the dropdown. A panel slides open on the right side of your screen. You can also right-click the image and choose Format options from the context menu. Either way gets you there.
Step 4: Expand the Adjustments Section
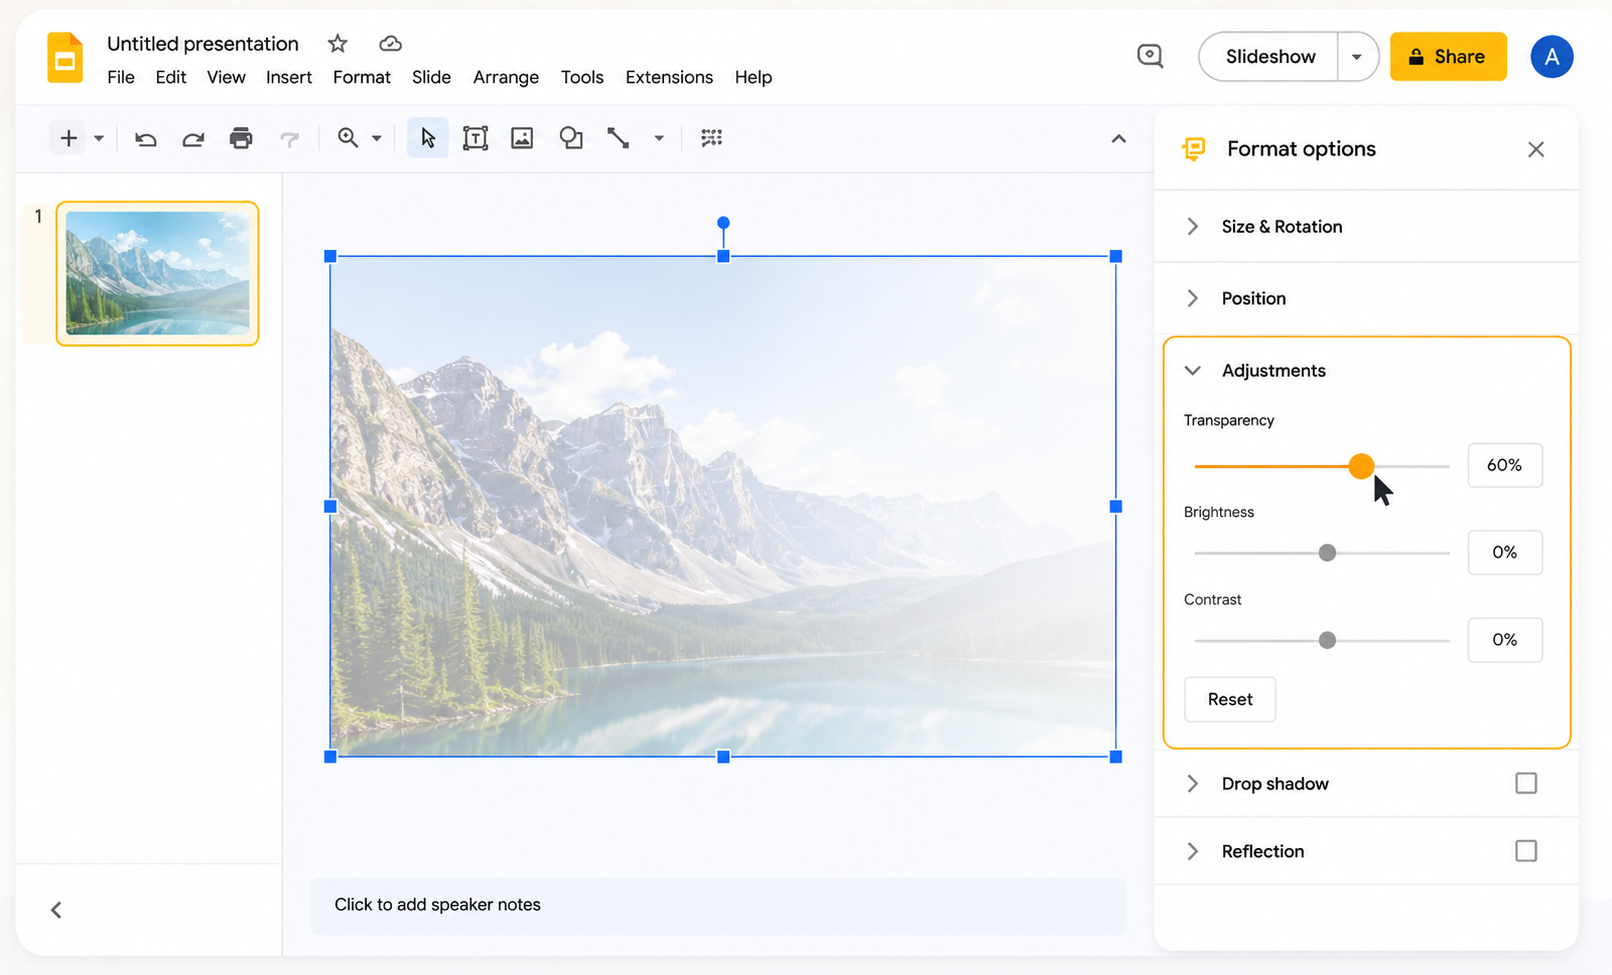
In the Format options panel, look for a section called Adjustments. Click it to expand. You will see three sliders: Transparency, Brightness, and Contrast. Transparency is the one you want and it sits at the top.
Step 5: Drag the Transparency Slider
Drag the slider to the right to increase how see-through the image becomes. The change previews in real time on your slide, so you can see exactly what you are getting. Start around 40–60% for a background watermark effect, or 70–80% for a very subtle texture layer.
Step 6: Close the Panel and Review
Click the X to close the Format options panel. Review your slide at full view. If it still feels too heavy, re-open and nudge the slider further right. There is no penalty for adjusting multiple times. Keep going until it looks right.
Keyboard shortcut: after selecting the image, press Alt + Shift + F on Windows or Option + Shift + F on Mac to open Format options without touching the menu.
The Best Use Cases for Image Transparency
Making an image transparent is a design decision, not just a technical one. Here is where it genuinely improves a slide:
Background photos: A full-bleed photo at 25–40% opacity gives the slide visual depth without drowning out the text on top. It feels layered and designed rather than like a plain coloured slide.
Watermark logos: Place your company logo at 10–15% opacity in a corner. Branded, but not distracting. This works particularly well on title slides and handout exports.
Behind infographics: Overlay a faded icon or illustration beneath a chart or data table to add visual context without clutter. If you work with infographic slides regularly, timelines, funnels, org charts, and dashboards, a well-built template from SlidesDepot already has these layer relationships set up for you.
Texture overlays: A semi-transparent texture layer softens a plain colour background and makes the slide feel designed rather than default. Even a simple paper or grain texture at 15% opacity adds a lot.
Image layering: Stack two images where one fades into the other. Useful for before/after comparisons or thematic transitions between sections.
Draft placeholders: Faded placeholder images signal “this will be replaced” during collaborative editing, without removing the composition entirely.
How to Make a Background Image Transparent in Google Slides
Background images behave slightly differently depending on how they were added.
If you inserted the image via Insert, then Image, the steps above apply exactly. If you used it as a slide background via Slide, then Change background, then Choose image, the transparency slider will not appear. Google Slides does not expose opacity controls for official slide backgrounds and this is a known limitation.
The fix is simple. Instead of setting a true slide background, insert the image as a normal picture element, resize it to cover the entire slide, then right-click and choose Order, then Send to back. Now you have full access to the Format options panel and the transparency slider. This approach is actually more flexible because you can adjust it any time without resetting the whole background.
Pro Tips for Getting the Transparency Right
Match the Image Type to the Effect You Want
Transparency works best on images with clear subjects such as product shots, icons, and illustrations. Busy, detailed photos can look muddy at partial opacity. For logos and icons, a PNG with a pre-cut transparent background often serves better than the opacity slider alone, because it removes the background entirely rather than fading it.
Combine Transparency with a Colour Overlay
For a polished, modern look, layer a semi-transparent coloured rectangle on top of your faded image. This creates the colour-washed background effect used widely in pitch decks and sales slides. You get consistent brand colour, subtle photo texture underneath, and readable text on top. Add a rectangle, fill it with your brand colour, set its transparency to 60–70%, and position it between the image and your text.
Know When the Slider Is Enough and When It Is Not
The Google Slides transparency slider affects the entire image uniformly. If you want a fade that goes from visible on one side to invisible on the other, you will need to prepare that gradient in Canva, Photoshop, or Google Drawings before inserting it. The slider alone cannot do directional fades.
Keep It Consistent Across Your Deck
If transparency is a deliberate design element in your presentation, use the same percentage across all slides that share the same treatment. Inconsistency in opacity across a deck feels like an oversight. Decide on a number, say 35% for all background photos, and stick to it.
Do Not Push It Past 80%
At above 80% transparency, most images become invisible enough that you might as well remove them. The effective visual range for most use cases is 15–60%. Test by stepping back from your screen. If you can still clearly make out the image, it may be too opaque. If you cannot tell it is there at all, it is too transparent.
PNG vs. JPEG: Which Format Works Better for Transparency?
When to Use PNG
PNG supports an alpha channel, meaning its background pixels can be fully removed before the image ever reaches your slide. This is the right choice for logos, icons, and illustrations where you want a clean cut-out rather than a faded background.
When to Use JPEG
JPEG does not support true transparency, but it responds just as well to the Google Slides opacity slider. It is the natural choice for photography used as backgrounds or overlays.
What About SVG?
SVG files support transparency natively, but Google Slides has limited handling for SVGs compared to PNG and JPEG. Use them when available, but do not rely on SVG for complex transparency work within Slides.
The short version: use PNG for objects that need their backgrounds removed, and use the opacity slider in Google Slides for any image you want to fade uniformly across the whole element.
How to Adjust Image Transparency in Google Slides on Mobile
The Google Slides mobile app on iOS and Android does include a Format options panel, but the path is slightly different.
Tap the image once to select it. A single tap, not a double tap, which would enter edit mode. Then tap the format icon, which is the pencil or paintbrush icon, in the toolbar at the top right of the screen. Scroll through the options panel until you reach Image adjustments. The transparency slider appears there and you can drag to adjust.
The mobile experience works fine for quick changes, but most people find the browser version more comfortable for detailed layout work. If you are doing a final polish before a meeting, mobile is perfectly usable.
Final Thoughts
Making an image transparent in Google Slides comes down to one place: Format options, then Adjustments, then the Transparency slider. Once you have found it the first time, it takes about ten seconds to adjust on any future slide.
The real value is not in the click. It is in knowing when to use it. Background images, watermarks, texture layers, and infographic overlays are the places where pulling back the opacity turns a busy slide into a clean one. Keep the settings consistent across your deck, combine with colour overlays for a more finished look, and remember that PNG with a pre-cut background is often the better tool for logos and icons.
If you are building presentations regularly and want to skip the setup work, SlidesDepot has a library of designer-crafted templates for both Google Slides and PowerPoint. Single slides and full decks, updated weekly, with a free plan to get started. Presentation design, simplified.


10 Best Table of Contents Slide Templates for PowerPoint in 2026
A strong table of contents slide does more than list your sections, it signals to your audience that your presentation is organised, intentional, and worth their attention. It sets the pace, reduces confusion, and gives every viewer a mental map before the first content slide even appears. Whether you are building an investor pitch deck, a…
What Is a Bar Graph Used For? 10 Bar Graph Examples Across Industries
Every business runs on data, but data alone does not persuade anyone. When you are presenting to stakeholders, pitching a strategy, or reporting on quarterly performance, your audience needs to understand your numbers quickly and confidently. That is exactly why knowing what is a bar graph is one of the most practical skills you can develop as…

What Is a 30-60-90 Day Plan and Why Is It Important?
Starting something new, whether it is a job, a project, or a personal goal, often comes with a simple question: where do I even begin? A 30-60-90 day plan is one of the easiest ways to answer that question. It breaks down the first three months into three clear stages, so you always know what…